Adding Custom Databank Entries
Important
The terms "Databank", "Encyclopedia" and "Ency" are used interchangeably throughout the game, its codebase and in mods. These are also referred to as "PDA Entries". Keep all of this in mind!
The PDA’s Databank is essential for providing players with large blocks of text that would otherwise take too long to read. These entries can also contain a custom image or audio file embedded within to enhance the player’s understanding of the information.
It is recommended to set up an Asset Bundle for Databank entries that involve custom assets. Asset Bundles simplify the process of loading assets to a single line per call, regardless of file type.
Creating a Databank entry through Nautilus
This tutorial will be based around the PDAHandler.AddEncyclopediaEntry(...) method.
The method listed above is the most straightforward way to register a custom entry to the game through Nautilus. Therefore, the following sections on entry creation will elaborate upon all of the parameters.
Keep in mind that simply creating a PDA entry is usually not enough. You must also determine how it is unlocked.
The Main Components of a Databank Entry
Key
| Parameter name | Value type | Nullability |
|---|---|---|
key |
string |
Essential property; must be assigned a proper value! |
Every PDA Databank entry has its own internal key (also referred to as an ID) which ensures uniqueness, allows for saving, and connects it with other systems. For example, a Story Goal that unlocks a Databank entry should have the same key / ID as the entry that it unlocks.
Path
| Parameter name | Value type | Nullability |
|---|---|---|
path |
string |
Essential property; must be assigned a proper value! |
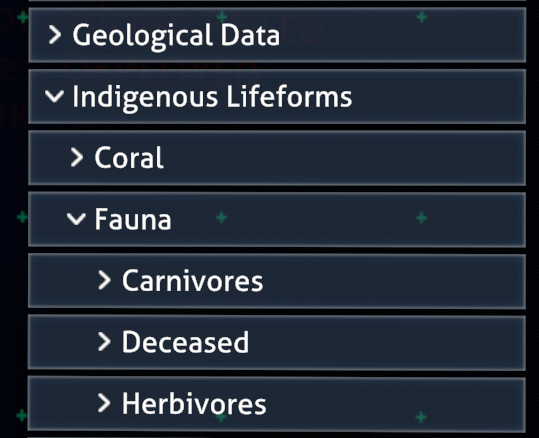
Every PDA entry has its own "path" which determines where in the PDA this entry is found. A typical path looks something like Lifeforms/Fauna/Leviathans.
Click here for a list of standard Databank paths
| Path | Display Name |
|---|---|
Tech |
Blueprints |
Welcome |
Survival Package |
Welcome/StartGear |
Additional Technical |
Tech/Habitats |
Habitat Installations |
Tech/Equipment |
Equipment |
Tech/Vehicles |
Vehicles |
Tech/Power |
Power |
Lifeforms |
Indigenous Lifeforms |
Lifeforms/Coral |
Coral |
Lifeforms/Fauna |
Fauna |
Lifeforms/Flora |
Flora |
Lifeforms/Flora/Land |
Land |
Lifeforms/Flora/Sea |
Sea |
Lifeforms/Flora/Exploitable |
Exploitable |
Lifeforms/Fauna/Herbivores |
Herbivores (UNUSED) |
Lifeforms/Fauna/Carnivores |
Carnivores |
Lifeforms/Fauna/Rays |
Rays (UNUSED) |
Lifeforms/Fauna/Sharks |
Sharks (UNUSED) |
Lifeforms/Fauna/Leviathans |
Leviathans |
Lifeforms/Fauna/Other |
Other Predators (UNUSED) |
Lifeforms/Fauna/SmallHerbivores |
Herbivores - Small |
Lifeforms/Fauna/LargeHerbivores |
Herbivores - Large |
Lifeforms/Fauna/Scavengers |
Scavengers & Parasites |
Lifeforms/Fauna/Deceased |
Deceased |
PlanetaryGeology |
Geological Data |
Advanced |
Advanced Theories |
DownloadedData |
Data Downloads |
DownloadedData/BeforeCrash |
Operations Logs |
DownloadedData/PublicDocs |
Public Documents |
DownloadedData/Degasi |
Degasi Survivors |
DownloadedData/Degasi/Orders |
Alterra Search & Rescue Mission |
DownloadedData/Lifepods |
CORRUPTED (UNUSED) |
DownloadedData/AuroraSurvivors |
Aurora Survivors |
DownloadedData/Codes |
Codes & Clues |
DownloadedData/Precursor |
Alien Data |
DownloadedData/Precursor/Terminal |
Terminal Data |
DownloadedData/Precursor/Scan |
Scan Data |
DownloadedData/Precursor/Artifacts |
Artifacts |
TimeCapsules |
Time Capsules |
You can also create your own paths. When doing this, make sure you set the language line properly. The key for a path in the language system is EncyPath_{path}, e.g. EncyPath_Lifeforms/Fauna/Leviathans.
Example of custom path creation
// Manual localization handling in case you choose to not use JSON localization
LanguageHandler.SetLanguageLine("EncyPath_Lifeforms/Fauna/Pets", "Pets");
LanguageHandler.SetLanguageLine("EncyPath_Lifeforms/Fauna/Pets/Robotic", "Robotic Pets");

// Adds "Doggo" to the "Pets" category:
PDAHandler.AddEncyclopediaEntry("Doggo", "Lifeforms/Fauna/Pets" ...);
// Adds "Robot Dog" to the "Robotic" category which is a subcategory of "Pets":
PDAHandler.AddEncyclopediaEntry("Robot Dog", "Lifeforms/Fauna/Pets/Robotic" ...);
Title and Description

| Parameter name | Value type | Nullability |
|---|---|---|
title |
string |
Can be null if implementing proper localization. |
desc |
string |
Can be null if implementing proper localization. |
Adding the text content is very simple as it is composed of only two strings that must be passed into the method.
Alternatively, you can use JSON-based localization and leave both the title and desc parameters as null.
Note
It is recommended to use JSON-based localization in your mod (as opposed to embedding lengthy text in your code) to allow for user translations.
Primary image
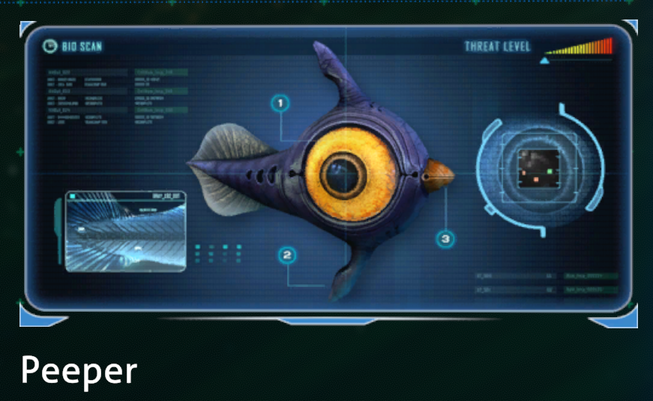
| Parameter name | Value type | Nullability |
|---|---|---|
image |
UnityEngine.Texture2D |
Can safely be left unassigned. |
The image of a Databank entry is its primary visual element. Each entry can have up to one image.
Creating your own image assets:
You can make your own Databank images, but it is recommended that you are consistent with the vanilla style of the game. Photoshop is recommended, as it was used to make these originally, but any image editor can work.
These tend to use the Agency FB font. Stock images are often used in the "close up" areas. A blank template for these is provided below:

Important
Please keep in mind that it is ILLEGAL to use Subnautica's art assets and style in other contexts. However, Unknown Worlds Entertainment has given modders permission to modify their assets for non-commercial purposes within Subnautica mods.
Popup images
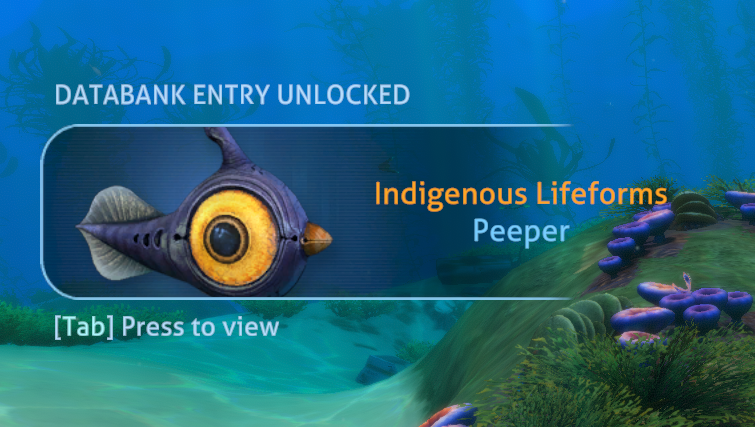
| Parameter name | Value type | Nullability |
|---|---|---|
popupImage |
UnityEngine.Sprite |
Can safely be left unassigned. Uses a default image. |
The popup image is a rather insignificant image that can be applied to your Databank entries. This small image appears to the left side of the screen for a few seconds when your entry is unlocked.
Creating your own popup images:
These images should follow the rules below:
- Typically 256x128 pixels.
- The image is usually cropped so only a decent portion of the render fits in the space.
- The contents NEVER extend to the rightmost side of the image.
- The contents typically do not extend to the left side of the image.
- If nearing the left side, the leftmost corners must always be cut out.
This image can be used as a template for cutting out the corners:

A complete popup image looks like this:
Unlock sound
| Parameter name | Value type | Nullability |
|---|---|---|
unlockSound |
FMODAsset |
Can safely be left unassigned, but will be automatically resolved to the default sound. |
By default the unlockSound parameter is null. This will be automatically resolved to
PDAHandler.UnlockBasic.
While you can technically use any sound asset, the only other recommended sound is
PDAHandler.UnlockImportant.
Voice logs
| Parameter name | Value type | Nullability |
|---|---|---|
voiceLog |
FMODAsset |
Can safely be left unassigned. |
The sounds for audio logs must first be registered through the CustomSoundHandler class. The
overload that takes an AudioClip
is recommended due to its simplicity. It is also suggested to use the AudioUtils.BusPaths.VoiceOvers bus.
After registering a sound, you must make an FMODAsset. An FMODAsset essentially acts as a container for your sound path. To create one use the
AudioUtils.GetFmodAsset(string)
method, where the path is the ID that you just defined in the CustomSoundHandler.
Finally, just pass this FMODAsset into the voiceLog parameter of the original method.
Usage
Examples
Example 1 - Localization embedded into code
Registers a new PDA entry with a main image, popup image and English title / description as defined in the code.
// Load the popup image, which is a basic Texture2D
Texture2D image = assetBundle.LoadAsset<Texture2D>("EldritchLogImage");

// Popup images, on the other hand, must be imported as Sprites
Sprite popup = assetBundle.LoadAsset<Sprite>("EldritchLogSprite");

string title = "Eldritch's Log";
string description = "I took one of the lifepods all for myself.\n\nIt's actually kind of lonely in here..";

// Since the title and description are passed into the method, Nautilus will internally assign the English
// lines to the localization keys 'Ency_EldritchLog' and 'EncyDesc_EldritchLog' respectively

// Register the encyclopedia entry into the game:
PDAHandler.AddEncyclopediaEntry("EldritchLog", "DownloadedData/PublicDocs", title, description, image, popup);
Example 2 - Localization handled by JSON files (recommended)
Registers a new PDA entry with a voice log, popup image and support for custom translations. Expects external JSON files or similar for localization.
// Remember: popup images must be imported as Sprites
Sprite popup = assetBundle.LoadAsset<Sprite>("KallieLogSprite");

// Register the custom sound into FMOD...
// The sound's ID can be anything, but it must correspond with the FMOD asset that will be created.
CustomSoundHandler.RegisterCustomSound("KallieAudioLog", assetBundle.LoadAsset<AudioClip>("AudioFileName"), AudioUtils.BusPaths.VoiceOvers);

// Create an FMOD asset using the same ID as the sound to pass into the method
FMODAsset kallieLogSound = AudioUtils.GetFmodAsset("KallieAudioLog");

// When null values are used for the title and description parameters in AddEncyclopediaEntry, Nautilus expects
// localization lines defined for the keys "Ency_YourEntryIdHere" (title) and "EncyDesc_YourEntryIdHere" (description)

// Register the encyclopedia entry into the game:
PDAHandler.AddEncyclopediaEntry("KalliesLog", "DownloadedData/PublicDocs", null, null, null, popup, kallieLogSound);

/* English.json example:
* {
*      "Ency_KalliesLog": "Kallie's Log",
*      "EncyDesc_KalliesLog": "[Transcript of the voice log]"
* }
*/
Making entries unlockable
Tip
The ency [key] command can be used to instantly unlock a Databank entry for testing purposes.
PDA entries are not unlocked by default, but there are various ways to add them to the player’s databank. Some methods are listed below:
| Method | Notes |
|---|---|
| Story Goal completion | Only occurs when GoalType is GoalType.Encyclopedia. See our documentation on the StoryGoalHandler class for more info. |
PDAHandler.AddCustomScannerEntry(...) |
Unlocks the PDA entry on scanning the "key" TechType. Make sure to set the encyclopediaKey parameter to the key of your encyclopedia entry. |
PDAEncyclopedia.AddAndPlaySound(string key) |
Adds the entry with the given key, shows a notification, and plays the correct sound (if defined) for this entry. |
PDAEncyclopedia.Add(string key, bool verbose) |
Adds the entry with the given key, and shows a notification if verbose is true. |
Example for unlocking with PDAHandler.AddCustomScannerEntry:
// Register encyclopedia entry like usual:
PDAHandler.AddEncyclopediaEntry("ArcticReaperEncy", "Lifeforms/Fauna/Leviathans", "Arctic Reaper", "A reaper leviathan that lives in a colder climate.");

// Use PDAHandler.AddCustomScannerEntry to make it unlockable.
// This code unlocks the encyclopedia entry when a prefab with a TechType of ArcticReaperTechType is scanned.
PDAHandler.AddCustomScannerEntry(ArcticReaperTechType, 4, false, "ArcticReaperEncy");
Example for unlocking with Story Goals:
// Register encyclopedia entry like usual:
PDAHandler.AddEncyclopediaEntry("SpadefishHate", "Advanced", "Spadefish are terrible", "Why do they lay eggs? Why do they damage your seamoth so badly?");

// Use the StoryGoalHandler to make it unlockable.
// This particular example uses the RegisterItemGoal method to unlock the encyclopedia entry when picking up a Spadefish:
StoryGoalHandler.RegisterItemGoal("SpadefishHate", Story.GoalType.Encyclopedia, TechType.Spadefish);